🍱 Customization
This theme offers comprehensive support for full site editing, allowing you to easily customize various elements of your website. You can effortlessly change the logo, update the navigation menu, and even create your own post templates. With these powerful features, you have the flexibility to tailor your website to your exact preferences and requirements.
Full site editing
Full Site Editing (or "FSE") is a group of connected capabilities that enables you to use blocks to update your entire website. As a result, there are more applications where you may use the Block Editor's comfortable and flexible experience.
To start making changes to the website, navigate to Appearance > Editor
TL;DR — Browse through the Templates and Template parts menu in the full site editor and make any changes you wish! You can revert the changes at any time.
Editing logo
- Navigate to
Appearance > Editor > Template Partsand choose any template that begins with Home or Header. - In the template editor, Click Site logo block and click Replace. Choose or upload new website logo.
- Click Save.
- Now all templates that use the Site logo block will be updated automatically except some templates that has own logo image block. You may check again in the template editor.
Editing primary navigation
- Navigate to
Appearance > Editor > Template Partsand choose Navigation – Primary. - To add top-level menu item, Click on the Mega menu block and click the black Plus icon.
- To add sub-level menu item, Click on the top-level menu item and click the white Plus icon.
- You can add any block to decorate the sub-menu, such as text, image or grid.
- Click Save.
Editing mobile navigation
- Navigate to
Appearance > Editor > Template Partsand choose Popup - Entire site. - Click on the Sliding Panel block and click the Navigation block.
- Edit the navigation block to have your mobile navigation.
- Click Save.
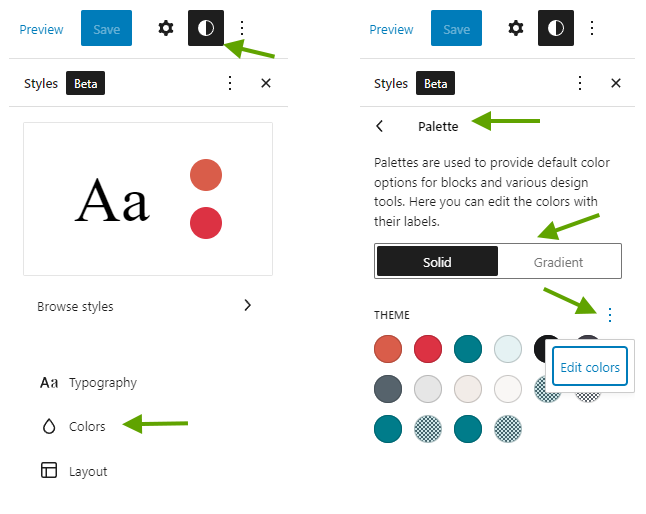
Editing colors
- Navigate to
Appearance > Editorand click the Styles button at the top right of the screen. - In the Styles panel, Click Colors > Palette. The theme's solid colors and gradient colors will be shown.
- To edit the color, Click the 3-dots button in the Theme section and choose Edit colors or Edit gradients.
- Now you can change any color. After finished, Click Done.
- Click Save to apply changes.
Editing social links
- Navigate to
Appearance > Editor > Template Partsand choose any template that begins with Home or Header. - Locate the Icon links block, which is used to display social links, in the template editor.
- To add new social link, Append an Icon link block into Icon links block.
- Click Save.
Editing social share
- Navigate to
Appearance > Editor > Template Partsand choose any template that begins with Single post. - Locate the Post share block, which is used to display social share links, in the template editor.
- Change the social links in the Social networks option of the block.
- Click Save.
Adding author social networks
You can add social networks for authors. The information will be shown in the About author block.
- Navigate to
Users > All usersand click the user you want to edit. - Or navigate to
Users > Profilefor editing the current user. - At user edit page, scroll down to the Additional options section.
- Enter information about a social network. You can sort the order of links by clicking the arrow button.
- Click the Update user button.
Editing widgets & sidebar
There are no longer any widgets like there were in classic-themes because this theme offers full site editing.
In the full site editor, there is a sidebar template that you can edit or create your own sidebar.
- Navigate to
Appearance > Editor > Template Partsand choose a template named Sidebar or create your own template by clicking the Add new button and select the Sidebar area. - Add any block you want to the sidebar template.
- Click Save.
- You can use the sidebar template on any page by adding a Template part block and choosing the desired sidebar.
Customize post & page templates
- Navigate to
Appearance > Editor > Templates. - To customize post template, Select a template that begins with Single post.
- To customize page template, Select a template that begins with Single page.
- Modify the template as you wish.
- Click Save.
Customize review template
- Navigate to
Appearance > Editor > Template Partsand select a template that begins with Review. - Modify the Review template block as you wish.
- Some review element blocks is avaialable only inside the review template block. Please click the Add block button inside of the review template block instead of using the add block button in the editor toolbar.
- Click Save.
Customize recipe template
- Navigate to
Appearance > Editor > Template Partsand select a template that begins with Recipe. - Modify the Recipe template block as you wish.
- Some recipe element blocks is avaialable only inside the recipe template block. Please click the Add block button inside of the recipe template block instead of using the add block button in the editor toolbar.
- Click Save.
Adding Ad Code
To add an ad code for all slot in website without editing the template, Please navigate to the Gutenmate menu in the admin area and click the section Advertisement. The Ad Code Preset option can be found in this section.
Just click the ad size you want to insert the code and paste into the textbox.
Click the button Save and go to your website to check the result.